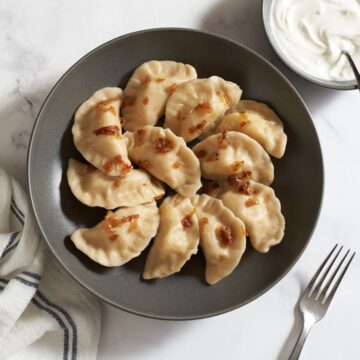
Varenyky are traditional Ukrainian dumplings filled with potato and onion that I grew up eating in my Ukrainian family. This is my all-time favorite family recipe! They can be boiled or pan fried and they're served with lots of sour cream!

Growing up in my Ukrainian family, potato varenyky were on the table for absolutely every holiday and family meal. We always ate them with lots of sour cream, and a mushroom gravy called pidpenky.
Like many Ukrainian recipes, varenyky can go by many names, depending on the region. My family came from western Ukraine and we call them pedaheh. You'll also see vareniki and perohy, among others, but they are all referring to the same type of Eastern European dumplings.
Varenyky can be what you might call a project, but it's a fun, satisfying, and delicious one! I've written a comprehensive, step-by-step guide to making them, and I hope you find as much joy in the process as I do. You can certainly do as my grandmother did and make them all yourself, but I recommend recruiting some family and friends to help you!
Jump to:
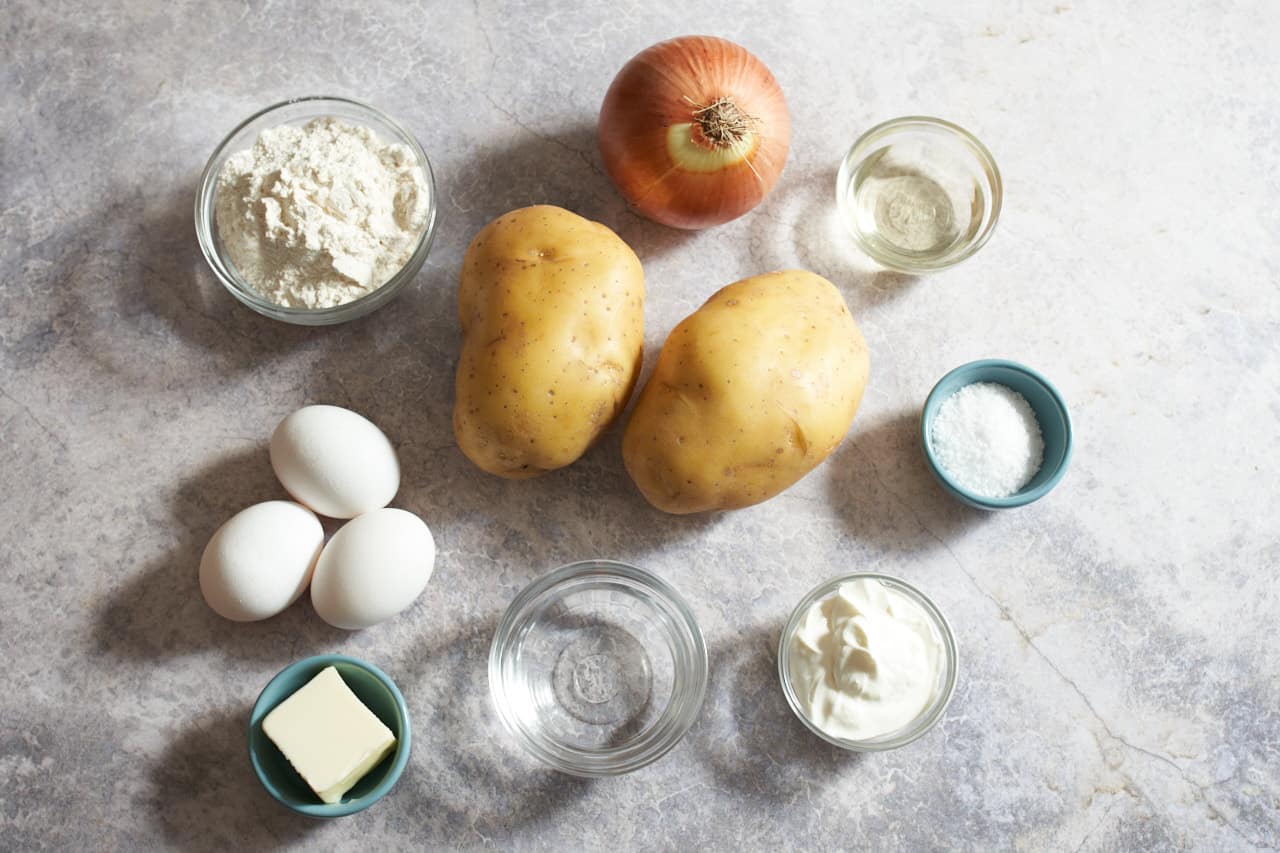
Varenyky ingredients
Varenyky dough
- All purpose flour: You don't need any kind of special flour, this is a simple, everyday dough.
- Egg: One egg will help the dough hold together, as well as add some fat to keep it tender.
- Water: We're making a water dough, no other liquid is necessary.
- Kosher salt: We'll season the dough with a little salt. You'll also need some salt for the boiling water.
Varenyky potato filling
- Mashed potatoes: I like to use Yukon Gold potatoes for mashed potatoes, and their light sweetness goes especially well with the onions in the varenyky filling.
- Onions: We'll use yellow onions, again for their mild, slightly sweet flavor, and dice them finely so you can taste them throughout the filling.
- Sunflower oil: We'll fry the onions in sunflower oil, an essential ingredient in Ukrainian cooking. You can substitute any neutral oil such as canola or grapeseed.
- Kosher salt (freshly ground black pepper is optional)
Additional ingredients:
- Sour cream: For me, sour cream is the most essential topping for Ukrainian varenyky dumplings. You can't have one without the other. If you're keeping things dairy-free, try a dairy-free sour cream or dairy-free Greek yogurt.
- Butter or sunflower oil: You'll need to toss the dumplings in a little butter or sunflower oil after they are boiled to keep them from sticking together. You can also fry them using one of these ingredients.
- Bacon or lardons: You can serve lardons or crispy bacon on top if you like!
How to make varenyky
This recipe makes about 25-35 potato varenyky, depending on the size of circle you cut out.
Step 1: Cook the potatoes
Bake the potatoes in the oven or the microwave. (I microwave them!) Carefully peel off the skin with your fingers while still warm and set aside.
I don't recommend boiling them as you would for mashed potatoes, because that could make the filling a little too wet.

Step 2: Fry the onions
Use a good chef's knife to dice the onions finely. Place a large non-stick skillet over medium heat and add the sunflower oil.
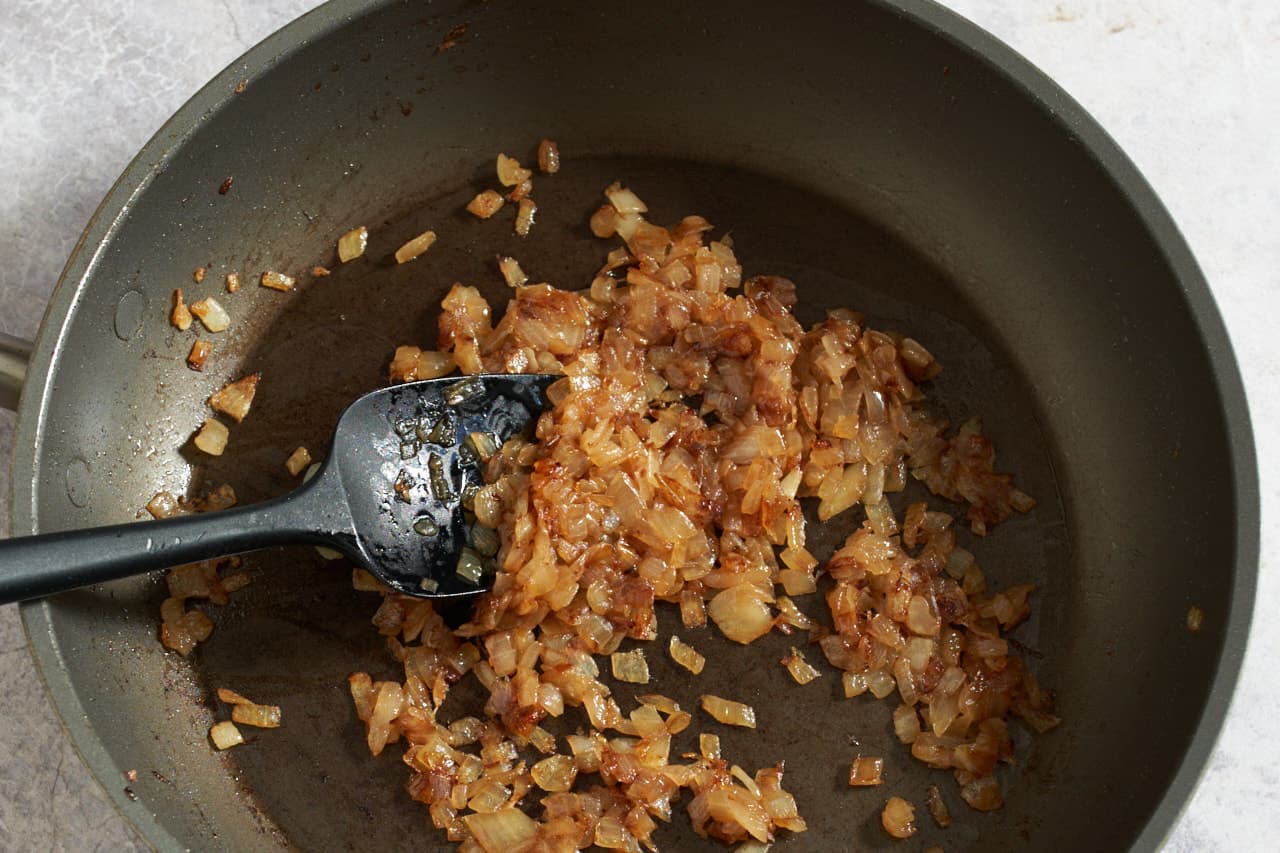
Add the onions and cook until they are translucent and beginning to get golden. If they seem to be browning too quickly, add a splash of water to the pan to slow down the cooking.

Step 3: Make the potato filling
Mash the potatoes (I use a potato ricer) and season with salt.
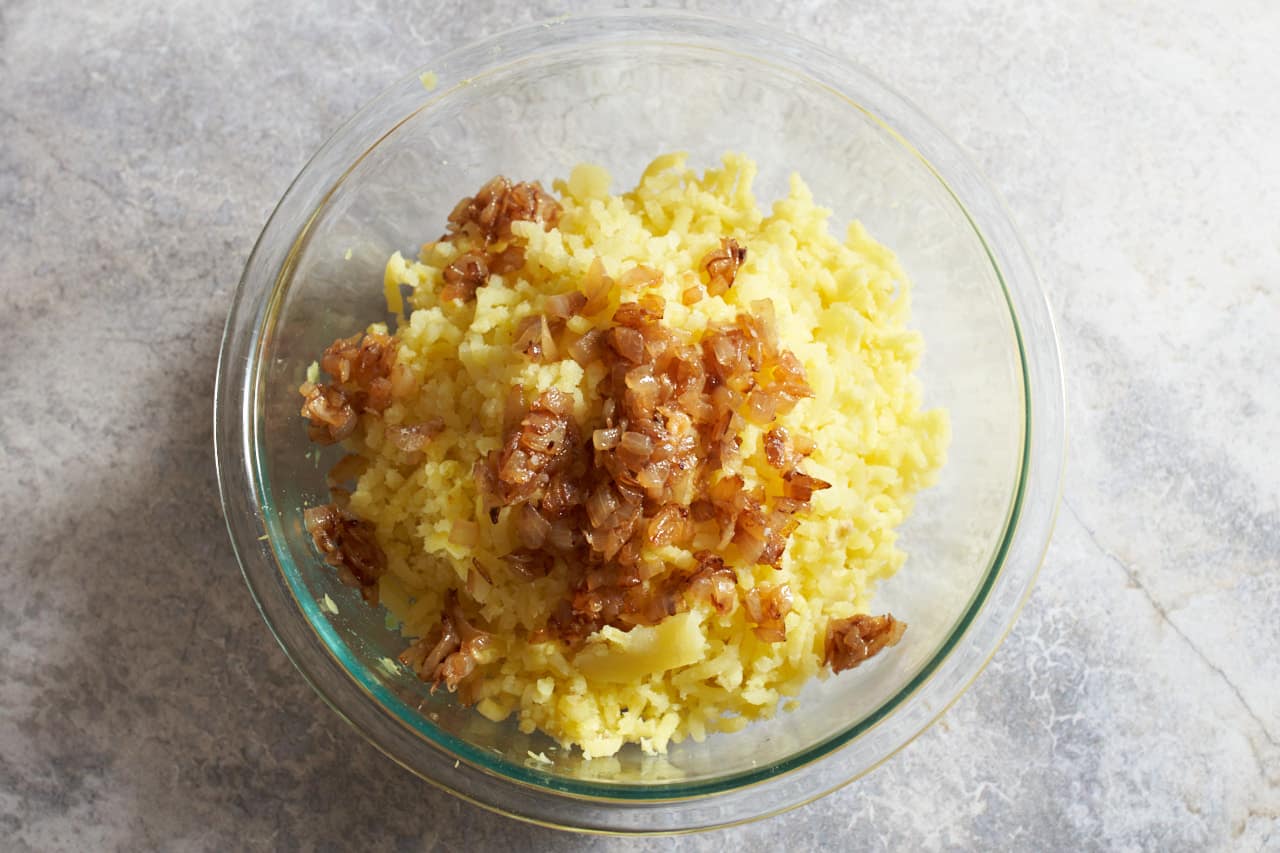
Add the onions to the potatoes and stir until smooth and all the onions are evenly distributed. Taste for seasoning and adjust if necessary. Set aside to cool.
If you like, you can reserve some of the onions to put on top for serving.
Pro Tip
Make sure the potato filling is well seasoned! If you haven't salted enough, your varenyky dumplings will taste bland.

Step 4: Make the varenyky dough
In a large bowl, whisk together the flour and salt, then make a well in the center.
Beat the egg gently until it is uniform with no visible strings of white. Add the water and egg to the well in the flour mixture.
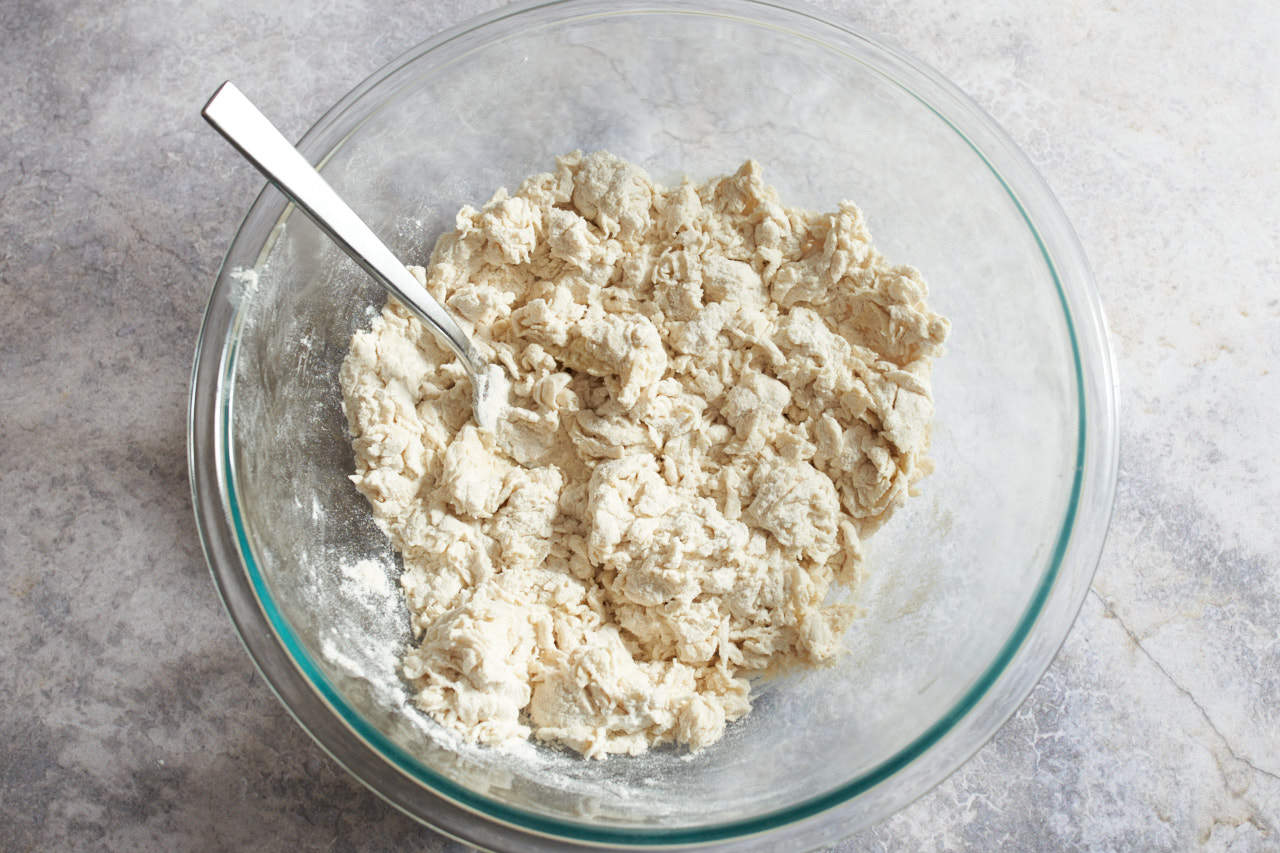
Use a fork and begin stirring the flour into the liquid in the center of the bowl until a shaggy dough forms.

Gently bring the dough together into a ball with your hands, making sure to get all the bits of flour at the bottom of the bowl. It will seem too dry, but don't worry.

Step 5: Knead the dough
On a lightly floured surface, knead the dough for about 3 minutes. It should feel lightly sticky at first. If it's very sticky, add a little more flour to your work surface.
After about 3 minutes it will be bumpy and look terrible, but this is correct! Cover it with a towel and let it rest at room temperature for 15 minutes.
Want to save this recipe?
You'll join hundreds of readers on my email list!

After it rests, knead the dough for another 3 minutes. It should be pretty smooth, and bounce back when you press on it.
Form the dough into a ball and wrap in plastic wrap. Let it rest at room temperature for 30 minutes.
Step 6: Roll out and cut the varenyky dough
Bring a large pot of heavily salted water to a boil. Cover it so it doesn't evaporate too much while you shape the dumplings.
Line a sheet pan with a kitchen towel and lightly dust it with flour. Have another kitchen towel ready to cover the dumplings once shaped.
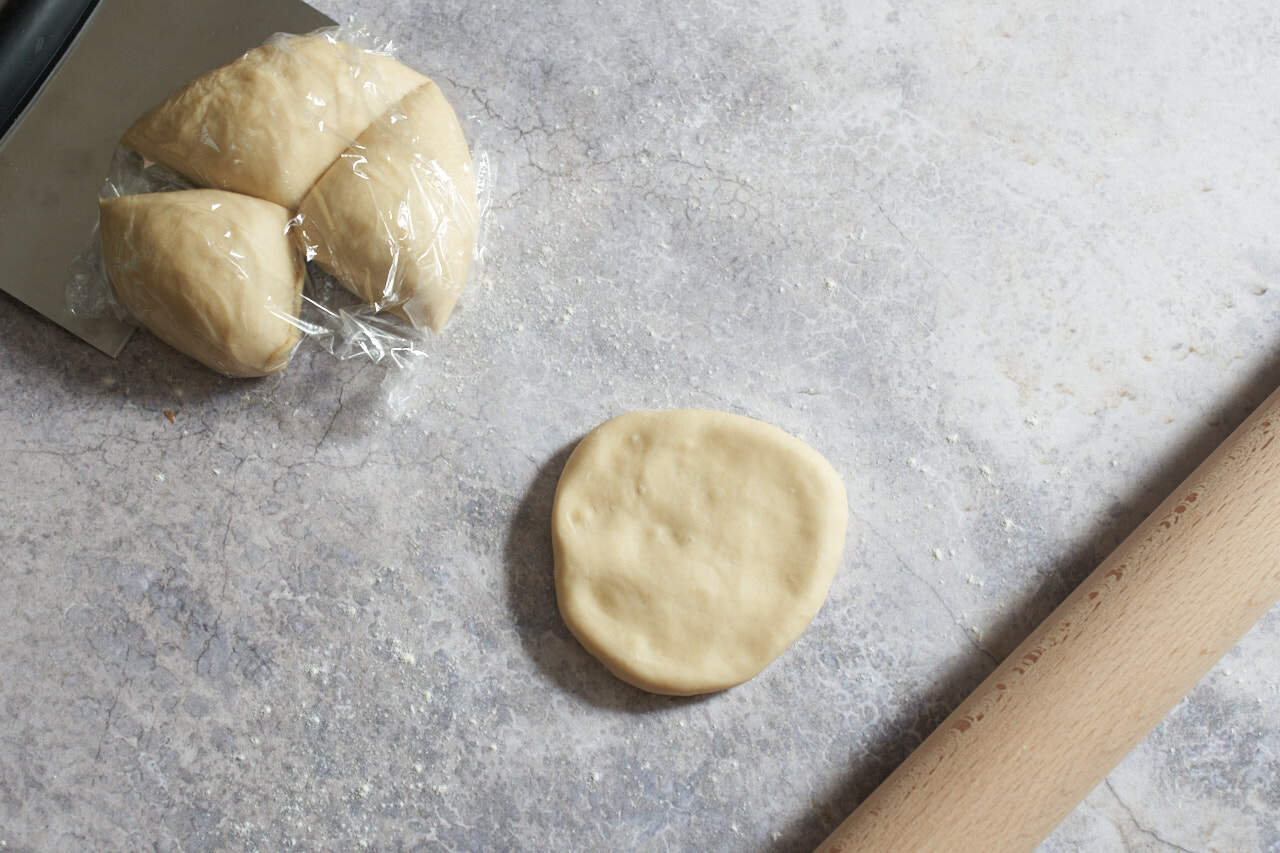
Use a bench scraper or large knife to cut the dough ball into 4 pieces. Set one aside and cover the remaining 3 with the plastic. Initially it might feel really sticky, but that will dissipate almost immediately once you start to roll it.
On a lightly floured surface, roll out the dough until it is between ⅛ and 1/16 of an inch thick. Keep turning the dough as you roll it out to keep it from sticking as you would pie dough.

Use a round cookie cutter about 3 inches in diameter (or a glass) to cut circles into the dough. Get them as close together as possible to get the maximum number of dumplings per piece of dough.

Step 7: Fill and shape the potato varenyky
Place some potato filling into the center of each dumpling wrapper. For this size circle, I use about 1 ¼ tablespoons. I use a cookie scoop to ensure that I don't overfill or underfill them.
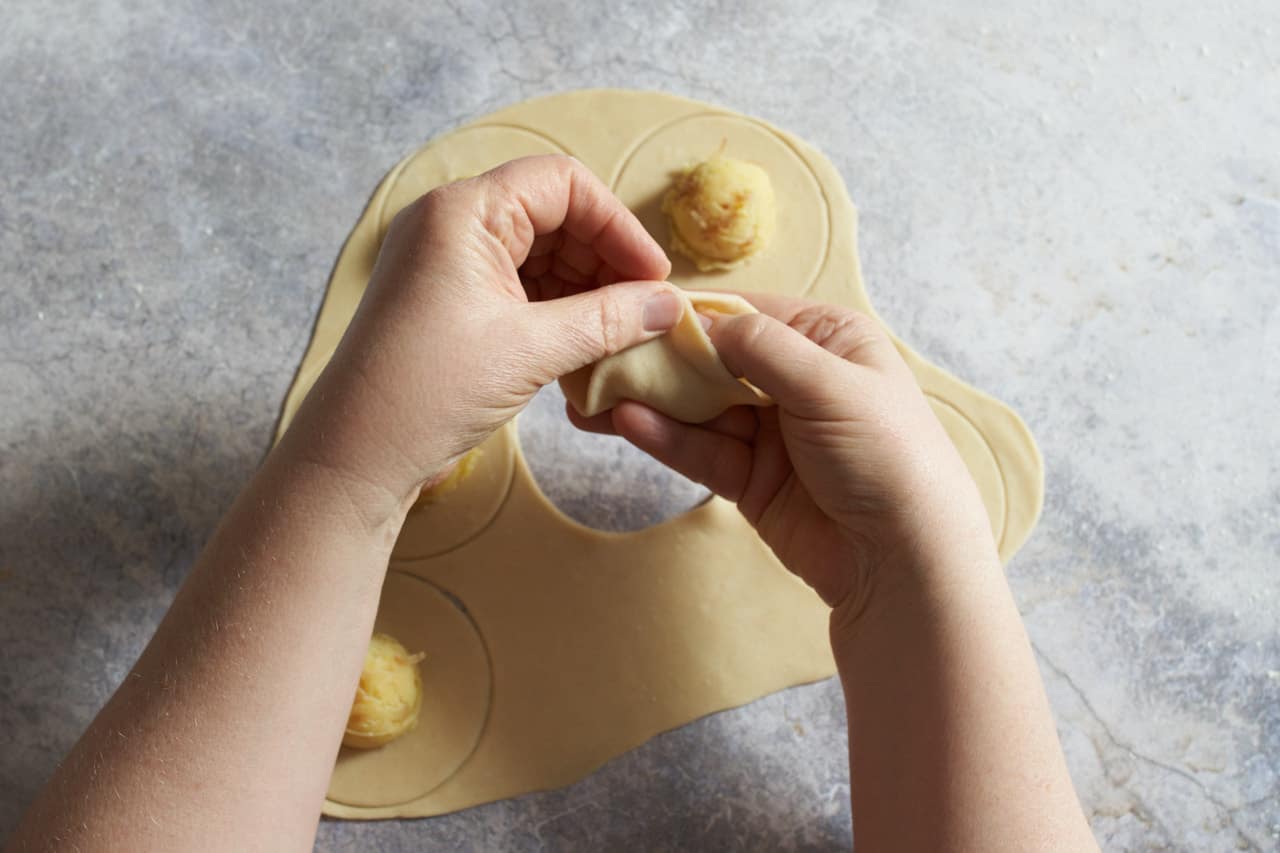
To shape the varenyky, gently pick up a round of dough with potato on it. Use your thumb to gently press down a bit on the filling, while using your other hand to pinch both sides of the circle together in the middle of the dumpling.
(Sometimes it's hard to get the dough to stick when you first bring it together. Just hold your fingers in place for a second or two to warm it up and it should stick more easily.)
Pinch the varenyky closed, working your way toward your thumb that's on top of the potato and making sure there are no air pockets. Then pinch the dough closed the other direction.
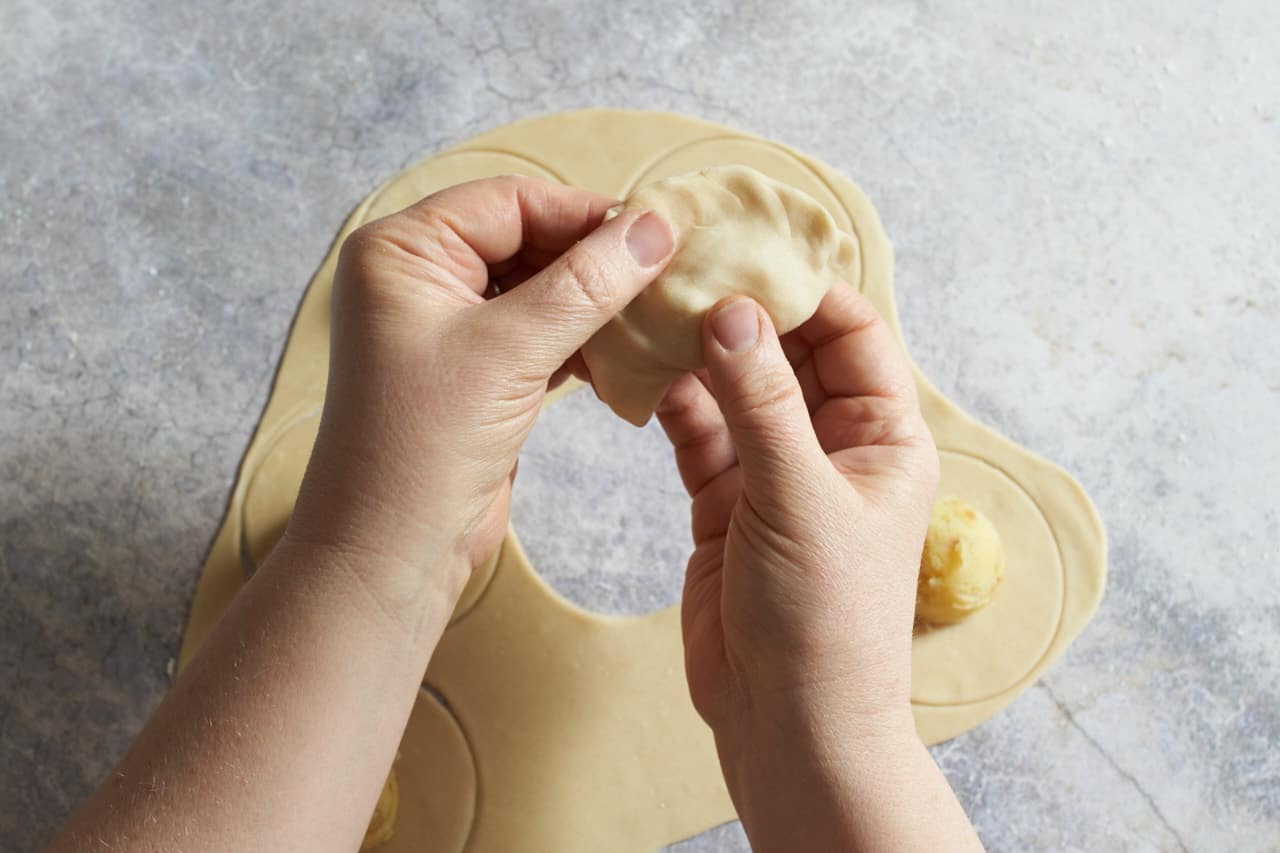
Gently double back and pinch the seam from one side to the other to make sure it is closed. I kind of move my thumb forward while moving my index finger backward which closes the seam and makes a nice pretty edge. (See tips below for other methods.)

Place the shaped varenyky on the lightly floured towel on the sheet pan, and cover with another kitchen towel to keep them from drying out while you shape the rest. Make sure they are not touching each other.
Roll the scraps into a ball and cover them with plastic.
Continue with the next 3 pieces of dough, one at a time, rolling, cutting, filling, then placing them on the sheet pan under the kitchen towel.
Finally, combine all the scraps and roll them out, cut, fill and shape. Do not roll out the final scraps. The dough will be too tough. But you can cut them into strips and boil them as noodles if you like.
Step 8: Boil the varenyky
Boil the varenyky in small batches, (too many at a time will stick together) in salted water for about 5-7 minutes. Give them a gentle stir from time to time to flip them over. (They are NOT done right after they float...the dough will not be cooked all the way yet.)
Use a slotted spoon to transfer them to a plate or shallow bowl with a pat of butter. Gently stir to coat with butter to keep them from sticking together. (Or drizzle with sunflower oil to keep them dairy-free.)
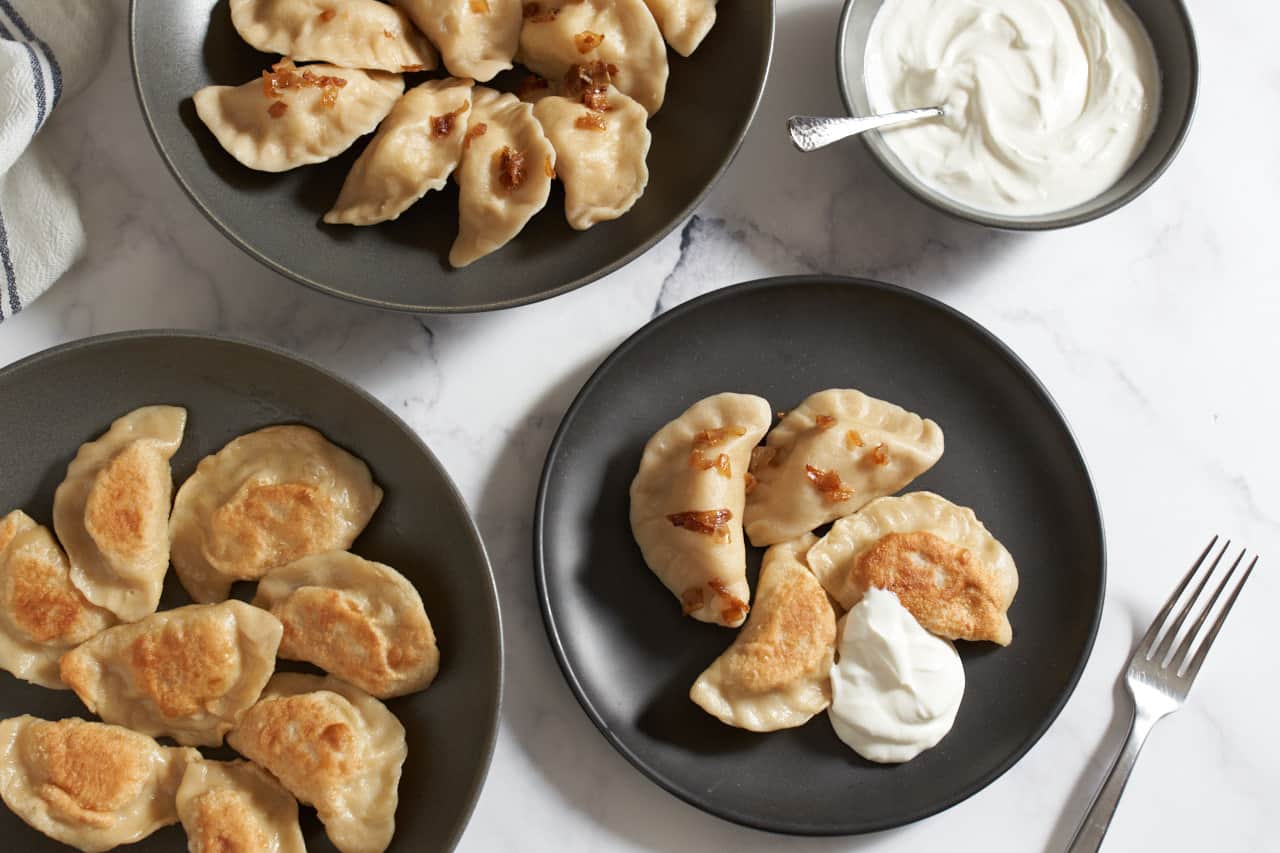
Continue this process until all of them are cooked. Serve immediately or fry them in butter. Serve with sour cream on the side and extra fried onions on top if desired.
Step 9: Fry the varenyky (optional)
If you wish to fry the varenyky to crisp them up, place a large non-stick skillet over medium heat. Add a couple of tablespoons of butter and several varenyky, frying them on each side until golden brown. Don't crowd the pan.
For the next batch, first wipe out the pan (the butter will start to burn if you don't) add more butter and continue frying.
Expert tips
- Accurate flour measurement is essential: I recommend weighing your flour to ensure the dough is not too wet or too dry. Kitchen scales are really affordable and once you have one, you'll use it all the time. If you are using measuring cups, fluff up the flour first so it's not packed down, then always use the spoon and sweep method, don't scoop with the measuring cup itself.
- Make sure the mashed potatoes are smooth: Lumpy mashed potatoes are the enemy of perfect varenyky because they can create air pockets, and air pockets could cause the dumplings to burst when they are boiling.
- Varenyky dough is much easier to roll out in smaller amounts: We are rolling this dough pretty thin, so it's best to work in batches when rolling out the dough. If you try to roll it all at once, it will take you a LONG time, and you risk drying out the dough too much before you get the dumplings filled.
- Don't try to boil too many at once: I know it's tempting because you want varenyky in your belly as soon as possible, but they need some room to move and float so they cook evenly don't stick together. It will depend on the size of your pot, I usually cook about 7 at a time.
- Our family always puts all the onions inside the varenyky: You'll often see varenyky served with the fried or caramelized onions on top, in my family we always put all the onions inside the filling. If you want to put some inside and reserve some to serve on top, you can totally do that. If not everyone likes onions you can just make a potato filling for the dumplings and serve the onions on the side.
- You can use a fork to crimp the edge if you don't want to do it by hand: Don't worry about making the perfect looking edge on your varenyky! As long as you make sure it's completely closed and not going to let any water in, you're good. You can use your fingers, or a fork, and even brush the edge with some egg white to seal it if you want to be extra sure.
- My grandmother ALWAYS fried the varenyky in butter: As soon as they finished boiling, she fried them on her electric griddle, we never ate them just boiled. So don't think you have to wait for the leftovers to fry them in butter, you can start off that way!
Make ahead, storing, freezing
Ukrainian varenyky dough and the potato filling can easily be made ahead! Shaped dumplings also freeze well so make lots to have at the ready when a craving strikes!
- To make the dough ahead: Make the dough through the second knead, then wrap in plastic and refrigerate overnight or freeze for up to one month. Allow to come to room temperature before rolling it out. (Thaw frozen dough in the refrigerator first.)
- To make the filling ahead: Allow to cool, transfer to an airtight container and refrigerate overnight or freeze for up to one month. (Thaw frozen filling in the refrigerator before using.)
- To freeze uncooked varenyky: Leave them on the sheet pan in a single layer and place in the freezer. Once frozen, transfer them to a freezer safe container or zip top bag and freeze for up to two months.
- To freeze cooked varenyky: Place in an airtight container and refrigerate overnight, then transfer to the freezer for up to two months.
- To reheat frozen varenyky: Uncooked potato varenyky can be dropped into boiling water, they'll take a few minutes longer to boil than when they are freshly made. Cooked varenyky can be pan fried directly from frozen. Clarified butter or sunflower oil is best so the butter solids don't burn.
- Store and reheat leftovers: Store cooked varenyky in an airtight container in the refrigerator for up to three days. Fry them in a non-stick skillet in butter or sunflower oil to reheat.
About varenyky dough
There are SO MANY ways to make varenyky dough. Some have milk, some have sunflower oil, some have sour cream, some have potato in the dough, not just the filling. They are all authentic, traditional ways of making Ukrainian varenyky. Every family has their own method.
My grandmother's recipe was lost, so I tested a LOT of different varenky dough recipes, researching methods from many sources including Olia Hercules, Anna Voloshyna, and Veselka. I found that this simple water dough is the easiest to work with and the most reliable. (And the easiest one to teach to all of you through this internet medium!)
FAQ
Varenyky is the Ukrainian language spelling. Vareniki is the Russian language spelling, made by Russian-speaking Ukrainians. They are the same thing! Pierogi are Polish dumplings, very similar to varenyky, but usually a bit larger.
Yes! There are probably hundreds of traditional fillings, both sweet and savory. Sauerkraut, mushrooms, farmer's cheese (kind of like ricotta or cottage cheese), pork, and beef are common savory options. Lightly sweetened farmer's cheese, blueberries, and sour cherries are popular sweet versions. Try variations of your own, if it sounds like it would be good in a dumpling or with pasta, it will probably taste good!
More Ukrainian recipes
Try these ideas for more homemade Ukrainian comfort food!
- Holubtsi (Ukrainian cabbage rolls) were one of my favorites at my grandma's house growing up.
- Pampushky are yeasted rolls that are the equivalent of Ukrainian garlic bread.
- Borscht is a hearty soup that is the national dish of Ukraine. Filling, comforting, and the most beautiful color.
- Cold Borscht is refreshing when the summer weather heats up, it's tangy and loaded with fresh flavors.
Varenyky are simple, traditional Ukrainian dumplings that everyone will love!
- The simple water dough is made from pantry ingredients.
- Make the dough and filling ahead!
- Freeze cooked or uncooked varenyky so you have them ready any time.
- Experiment with different fillings both savory and sweet.
- Serve them boiled or pan-fried, with lots of sour cream!
If you enjoy this recipe, please leave me a 5-star rating ⭐️⭐️⭐️⭐️⭐️ in the recipe card! It really helps others find my content and helps my business grow! Sign up for my newsletter for recipes delivered to your inbox and follow me on Instagram and Pinterest! Thank you!
Recipe
Varenyky Recipe
Want to save this recipe?
You'll join hundreds of readers on my email list!
Equipment
- round cookie cutter or use a glass
- kitchen scale or measuring cups
- cookie scoop optional
- kitchen scale optional
Ingredients
Varenyky Dough
- 350 grams flour (just under 2¾ cups)
- 1 teaspoon kosher salt
- 1 egg
- ⅔ cup water
Potato Filling
- 2 pounds yukon gold potatoes
- 2 medium yellow onions
- 2 tablespoon sunflower oil or other neutral oil such as grapeseed or canola
- 1 teaspoon kosher salt
- freshly ground black pepper optional
Additional ingredients
- unsalted butter for coating and frying
- sour cream for serving
Instructions
Potato Filling
- Bake the potatoes in the oven or the microwave. (I microwave them!) The skin will peel off easily using your fingers once they've cooled a bit. (I don't recommend boiling them as you would for mashed potatoes, because that could make the filling a little too wet.)
- Dice the onions finely. Place a large non-stick skillet over medium heat and add the sunflower oil. Add the onions and cook until they are translucent and beginning to get golden. If they seem to be browning too quickly, add a splash of water to the pan to slow down the cooking. Season with a pinch of salt.
- Mash the potatoes (I use a potato ricer) and season with salt. Add the onions to the potatoes and stir until all the onions are evenly distributed and the mixture is smooth. Taste for seasoning and adjust if necessary. Set aside to cool. If you like, you can reserve some of the onions to put on top for serving.
Varenyky Dough
- In a large bowl, whisk together the flour and salt, then make a well in the center.
- Beat the egg gently until it is uniform with no visible strings of white. Add the water and egg to the well in the flour mixture. Use a fork and begin stirring the flour into the liquid in the center of the bowl until a shaggy dough forms.
- Gently bring the dough together into a ball with your hands, making sure to get all the bits of flour at the bottom of the bowl. It will seem too dry, but don't worry.
- On a lightly floured surface, knead the dough for about 3 minutes. It should feel lightly sticky at first. If it's very sticky, add a little more flour to your work surface. After about 3 minutes it will be bumpy and look terrible, but this is correct! Cover it with a towel and let it rest at room temperature for 15 minutes.
- After it rests, knead the dough for another 3 minutes. It should be pretty smooth, and bounce back when you press on it. Form the dough into a ball and wrap in plastic wrap. Let it rest at room temperature for 30 minutes.
Roll and shape the varenyky
- Bring a large pot of heavily salted water to a boil. Cover it so it doesn't evaporate too much while you make the dumplings. Line a sheet pan with a kitchen towel and lightly dust it with flour. Have another kitchen towel ready to cover the dumplings once shaped.
- On a lightly floured surface, roll out the dough until it is between ⅛ and 1/16 of an inch thick. Keep turning the dough as you roll it out to keep it from sticking as you would pie dough.
- Use a round cookie cutter about 3 inches in diameter (or a glass) to cut circles into the dough. Get them as close together as possible to get the maximum number of dumplings per piece of dough.
- Place some potato filling into the center of each dumpling wrapper. (About 1¼ tablespoons for this size circle.) I use a cookie scoop to ensure that I don't overfill or underfill them.
- To shape the varenyky, gently pick up a round of dough with potato on it. Use your thumb to gently press down a bit on the filling, while using your other hand to pinch both sides of the circle together in the middle of the dumpling. (Sometimes it's hard to get the dough to stick when you first bring it together. Just hold your fingers in place for a second or two to warm it up and it should stick more easily.)
- Pinch the varenyky closed, working your way toward your thumb that's on top of the filling and making sure there are no air pockets. Then pinch the dough closed the other direction.
- Gently double back and pinch the seam from one side to the other to make sure it is closed. I kind of move my thumb forward while moving my index finger backward which closes the seam and makes a nice pretty edge. (See notes below for other methods.)
- Place the shaped varenyky on the lightly floured towel and cover with another kitchen towel to keep them from drying out while you shape the rest. Make sure they are not touching each other. Roll the scraps into a ball and cover them with plastic.
- Continue with the next 3 pieces of dough, one at a time, rolling, cutting, filling, then placing them on the sheet pan under the kitchen towel. Finally, combine all the scraps and roll them out, cut, fill and shape. Do not roll out the final scraps. The dough will be too tough. But you can cut them into strips and boil them as noodles if you like.
Boil the varenyky (and fry them if you like!)
- Boil the varenyky in small batches, (too many at a time will stick together) in salted water for about 5-7 minutes. Give them a gentle stir from time to time to flip them over. (They are NOT done right after they float...the dough will not be cooked all the way yet.)
- Use a slotted spoon to drain them and transfer to a plate or shallow bowl with a pat of butter. Gently stir to coat with melted butter to keep them from sticking together. (Or drizzle with sunflower oil to keep them dairy-free.) Continue this process until all of them are cooked. Serve immediately, or fry them first!
- If frying the varenyky, place a large non-stick skillet over medium heat. Add a couple of tablespoons of butter and several varenyky, frying them on each side until golden brown. Don't crowd the pan. For the next batch, first wipe out the pan (the butter will start to burn if you don't) add more butter and continue frying.
- Serve varenyky with sour cream and extra onions on top if desired.
Notes
- Accurate flour measurement is essential: I recommend weighing your flour to ensure the dough is not too wet or too dry. Kitchen scales are really affordable and once you have one, you'll use it all the time. If you are using measuring cups, fluff up the flour first so it's not packed down, then always use the spoon and sweep method, don't scoop with the measuring cup itself.
- Varenyky dough is much easier to roll out in smaller amounts: We are rolling this dough pretty thin, so it's best to work in batches when rolling out the dough. If you try to roll it all at once, it will take you a LONG time, and you risk drying out the dough too much before you get the dumplings filled.
- You can use a fork to crimp the edge if you don't want to do it by hand: Don't worry about making the perfect looking edge on your varenyky! As long as you make sure it's completely closed and not going to let any water in, you're good. You can use your fingers, or a fork, and even brush the edge with some egg white to seal it if you want to be extra sure.
- My grandmother ALWAYS fried the varenyky in butter: We never ate them immediately after they were boiled. She always fried them on her electric griddle before serving them. So don't think you have to wait for the leftovers to fry them in butter, you can start off that way!
Nutrition
Nutrition information is automatically calculated as an estimate. Calorie accuracy is not guaranteed.


Mary Kokorudz says
I haven’t made these yet but definitely want to. I loved your grandmother’s pedaheh!
Debra says
Hi Mary,
They are so gooooood!!!! Let me know how they turn out for you!
Thanks for reading and trying my recipes,
Debra
Kateryna says
I have not tried these yet, but they look delicious. Thank you for your input, Mary. Also let me know what you think, so I can build my opinion accordingly.
Debra says
Hi Kateryna,
I hope you try them soon, and let me know how you like them.
Thanks for reading,
Debra