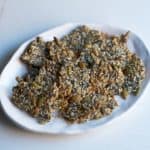
Gluten Free Crackers with Seeds and Oats
Servings: 9
Calories: 89kcal
This gluten free crackers recipe is so easy! The crackers are tasty and crunchy, and perfect for everyday snacking or entertaining. Ready in about an hour.
Print Recipe
Ingredients
- 1 cup rolled oats
- ¾ cup raw pumpkin seeds (pepitas)
- ⅓ cup raw sunflower seeds
- ⅓ cup sesame seeds
- 3 tbsp chia seeds
- 3 tablespoon poppy seeds
- 1 teaspoon kosher salt
- 1 tbsp plus 1 tsp vegetable oil
- 1 tbsp pure maple syrup or agave syrup
- ¾ cup water
Instructions
- Preheat oven to 375 degrees.
- Combine all dry ingredients into a medium-sized bowl.
- In a small bowl, combine liquid ingredients.
- Pour liquid over dry ingredients and stir to ensure liquid is evenly distributed throughout. Let stand 10 minutes to allow mixture to thicken.
- Prepare two parchment-lined baking sheets.
- Divide the mixture between each baking sheet, and form into a ball. Place an additional piece of parchment over each ball of dough and, using a rolling pin or heavy-bottomed pan, flatten to about ¼ inch thick. It can be any shape and jagged edges mean crispy deliciousness.
- Bake for 15-20 minutes until the edges begin to brown. (If you are using agave, this browning seems to happen much faster so keep an eye on it.)
- Remove from oven and slide the crackers off the baking sheet. Tear a new sheet of parchment and lay it on top of each cracker. Lift the bottom piece of parchment and gently flip the crackers over, so the new sheet of parchment is on the bottom. The cracker is hot and this is not the most graceful of moves. You can use your hands, a spatula, or do what I did, and kinda grab two ends of the parchment and lift and flip and hope for the best. Note: the cracker might break when you do this. That is okay. That just means more crispy edges. Remove the old piece of parchment and return the cracker to the baking sheet.
- Bake for an additional 15-20 minutes until edges turn golden brown. Allow to cool slightly and then break up into pieces.
Notes
- If you are using agave, it seems to brown much faster in the oven, so keep an eye on it.
- If you don't like/don't have some of the seeds, you can play with the measurements. But don't skip the chia seeds. You need their moisture-absorbing qualities to help hold the cracker together.
- You need some good sheet pans for this recipe that are larger and that won't warp. I have some from Chicago Metallic and some by Nordic Ware, both work equally well for this recipe.
Nutrition
Calories: 89kcal | Carbohydrates: 6g | Protein: 3g | Fat: 6g | Saturated Fat: 1g | Sodium: 131mg | Potassium: 88mg | Fiber: 2g | Sugar: 1g | Vitamin C: 1mg | Calcium: 68mg | Iron: 1mg